Wednesday, May 10, 2017

South Middle School Flight

Introduction

On May 2nd, 2017 our class did a field exercise at the community garden, just south of South Middle School, in Eau Claire, Wisconsin. The field exercise included multiple missions and platforms.

Platform cases and GCP equipment


Process

Prior to any missions being flown, we needed to conduct pre-flight checks and mission planning. We checked the equipment, to include all of the items that were in the previous report regarding mission planning, including checking batteries/equipment, weather, etc. When we were in the field, we had to use a MyFi (WiFi) to update the DJI firmware prior to starting the mission. DJI doesn't allow their drones to fly without the latest version.

Upon arrival, GCPs were set up around the garden and GPS data regarding said GCPs were recorded and inputted into the mission software. 9 points were set out around the garden, in a (generally) counter-wise pattern.

GCP data aquisition

Zoomed in on level when recording GCP/GPS data


Garden with GCPs


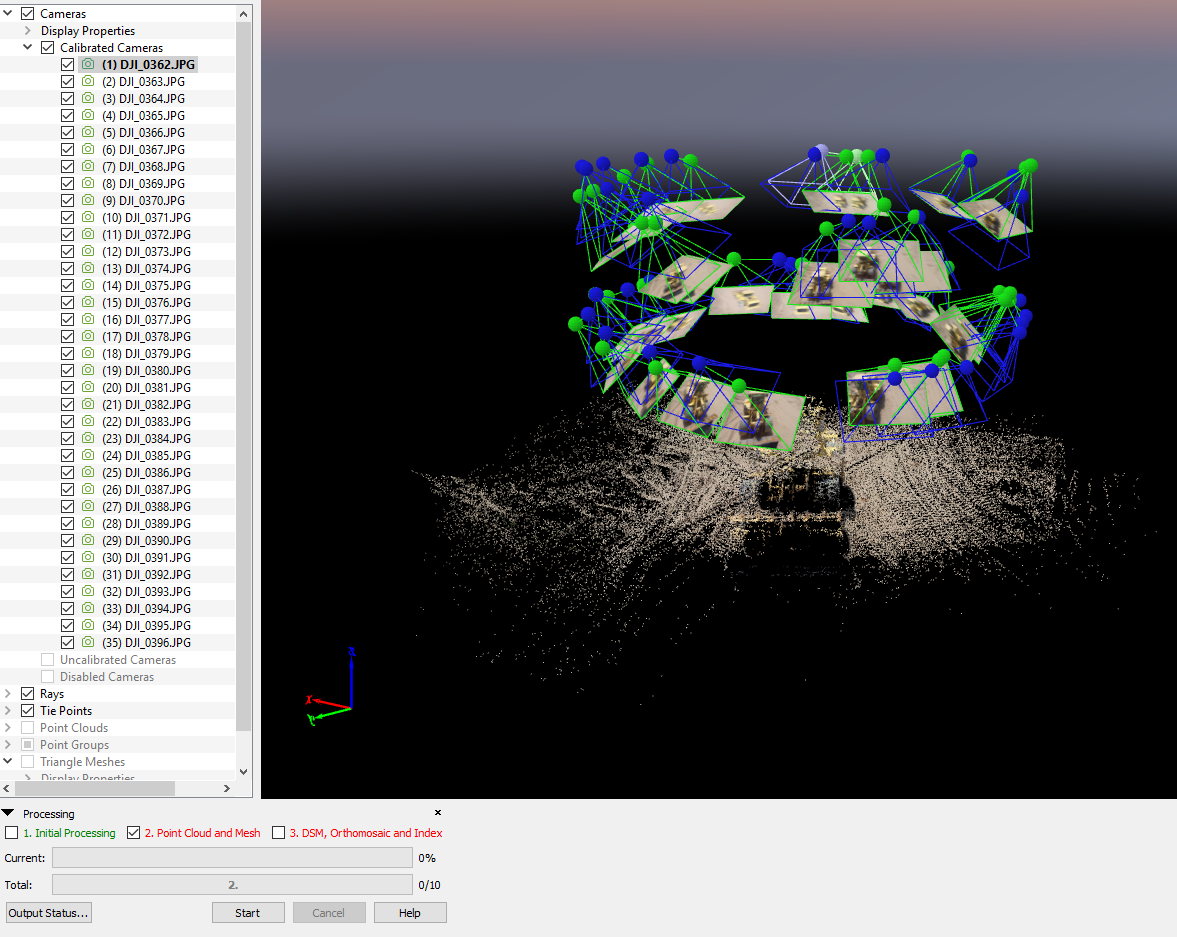
Two missions were conducted with a DJI Phantom 3 at 70 meters. The first mission was to survey the community garden. The second mission took oblique imagery around our vehicles. The DJI Inspire Pro flight was simple a demo of the platform, with no imagery taken.

Inspire Platform


On this particular day, winds, at times, exceeded 15mph. Takeoffs were done manually, and then the platforms were maneuvered, to insure serviceability, prior to initiating the planned missions. Once maneuvering was satisfactory, the planned missions were started. Once the missions were started, the platform and the software took over, and completed the entire missions, including landings, automatically. Even though there was autonomy in the missions, it was still important to have personnel monitor the platform in the air as well as have personnel monitor the display on the controller. Monitoring these factors allow for quick reaction time to anything unexpected that may have occurred.

Once harvested, DR. Hupy processed the imagery from both missions in Pix4D.

Maps

This map shows the elevation of the study site. Besides the trees that border the garden, one can see that the elevation of the entire site is fairly level.


This orthomosaic shows the entire study site as a combined aerial image.

Conclusion

Getting some experience in the field is the best way to learn the process (pre-flight, GCPs, mission planning, adjustments, etc.). The most important thing is to make sure you've gone through your checklist, and be prepared for just about anything.

Most missions will not go exactly as planned, and UAS personnel need to be flexible and adapt to any situation. In this case, we couldn't conduct the mission until the DJI Phantom 3 firmware was updated. It took perhaps 20-30 minutes to download and install the firmware. Without WiFi hot-spot equipment, we would not have been able to conduct the mission.

This was a great learning experience!

Monday, May 1, 2017

Ground Control Point (GCP) Construction

Construction of GCPs is an easy task that's great for rainy days. This week, our class assisted Dr. Hupy in the making of 16 GCPs that we are going to use for a later mission. 

We went to his house to use his table saw and paints. GCPs can be made out of many materials, but experience has taught Dr. Hupy that 1/4" x 4' x 8' high density polyethylene sheets are an ideal, durable material.


We cut the sheets into 2' x 2' squares.


Next, we used a template to paint pink triangles that come to a point in the middle of each square. We also used yellow paint to number the squares, 1 through 16, respectively.


When we were done, we had 16 GCPs. The black and neon colors make the GCPs contrast and very conspicuous to users of UAS imagery.


Monday, April 24, 2017

Mission Planning

Introduction

To conduct UAS missions effectively, one must plan accordingly. Before embarking on missions, UAS pilots and personnel must account for many variables before even leaving the office.

First and foremost, UAS personnel need to understand their study site. They need to understand the terrain, the vegetation (or lack thereof), and other Anthropogenic features and obstacles. They need to understand if their equipment will receive the signal necessary to complete their work. If not, they need to consider alternate methods to do so, such as creating WiFi signals with equipment.

Their equipment needs to be ready and inspected. This includes making sure they have ample power sources (usually batteries, small engines, or perhaps generators). Their equipment needs to also be serviceable.

They need to understand other variables as well, including the weather and whether or not there will be people in the study area (flying over people is illegal).

Multiple mission plans give users ways to pivot and troubleshoot unexpected issues. As in life, so is in UAS, where having plans A-E may come in handy.

Upon departure, UAS personnel would do well to develop checklists, to insure they have all of the necessary equipment, as well as anything that needs to be completed in a specific order. One last check of the weather is prudent upon departure as well.

While in the field, constant monitoring is critical to mission success. UAS personnel should always be monitoring changes in weather conditions, and verify their previous research in regards to structures and vegetation. Any changes may require a pivot in the mission.

In addition, while in the field, UAS personnel should assess any electro-magnetic interference possibilities, understand the elevation implications throughout the various mission plans, verify cellular connectivity, install field observations into pre-flight checks, flight logs, and mission plans. UAS personnel need to understand their individual jobs during the mission and work as a team.

Bramor Mission Planning Software


The Bramor Mission Planning Software(C-Astral Pilot; C3P) allows UAS personnel to create mission plans for their flights. It is ideally suited for remote sensing and surveying applications that require ease and accuaracy.

C-Astral Pilot Software Features

  • Ergonomic touch screen GUI
  • Critical flight control data always present on screen
  • Seamless and fast mission planning
  • In-flight systems monitoring
  • Area, mission time, GSD and precision estimation
  • Failsafes management
  • System health monitoring
  • Real-time camera feedback

Review


Once again, I find it difficult to review a product of which I never used anything that I can compare it to. This was my first experience with any kind of mission planning software. My understanding is that many drone manufacturers create their own versions to go along with their platforms.

The interface of C3P looks incredibly user friendly, yet I found this to be deceptive. There is no conspicous way to start a mission plan. When I opened the software, I didn't realize that it already had a mission started for me in Europe.

I tried to create a mission plan for the golf course I frequent in Eau Claire, Wisconsin, and struggled to create a take-off point.


Within the software, the user can adjust variables such as speed and altitude. The software is smart enough to show the adjustments to other variables, that a change in one would make.


Once I chose to view the flight in 3D (which takes the user to ArcGIS to view), I figured what was wrong, and was able to start a new mission. There is no way I'd have the battery power for that flight!


I then created various missions for Princeton Valley Golf Course.


I then did one for the original site in Europe, as well as one that went along a road there.


Afterwards, I viewed this mission in 3D (ArcMAP).


I'm not 100% sure I created a mission plan as was intended. I was surprised with how difficult the software was to use, given how user-friendly it appears. But to say that I'm a novice in this field would be generous, so this issue could very much lie with my inexperience.

I'm sure if I tinkered with the software more and/or shadowed a user for some time, my comfort and understanding of the software would be much greater.

Until then, I give it 3 out of 5 stars.

Sources

http://www.c-astral.com/en/products/bramor-ppx

Monday, April 17, 2017

Oblique Imagery

Introduction - This week the lab task was to create 3D models out of processed imagery in Pix4D. Pix4D uses oblique imagery to create the models. This means that as a drone takes multiple pictures of one object, Pix4D uses the various angles to better represent the object in 3D.

The imagery was provided by Dr. Joseph Hupy at the University of Wisconsin - Eau Claire was from 3 separate flights of a DJI Phantom 3. One data set is of a small structure adjacent to a South Middle School (also in Eau Claire) track field (track shed), another is of a tractor located at the Litchfield Mine (imagery used in previous labs), and one of his old truck, the late "Guzzler," may she resell in piece.

Methods - Pix4D was the only GIS software used in this lab. The software was able to process the imagery, annotate the background, create point clouds and meshes, and create videos of the models.

First, all three flights underwent initial processing (Figures 5 and 6). Once initial processing was done, some of the images needed to be annotated, a process the tells Pix4D what is in the back or foreground of the imagery. Annotating (Figures 2, 3, and 4) various pictures from the data set trains Pix4D as to what is to be included and excluded out of the models. In this lab, the only parts of the images that weren't annotated were the track shed, tractor, and the truck, respectively (Figures 7, 8, and 9).

Four pictures were chosen from each data set to annotate, one from each side of the object so Pix4D would have annotated data from multiple angles. Annotating paints those areas of the images pink before applied. This is a tedious process that is quicker to do the further zoomed out the image is oriented. However, one can be more accurate zoomed in, and some areas required it, such as the truck wheel in Figure 4.

Once annotated, the imagery is then reprocessed with the point cloud and mesh (Figure 1), to include annotations. Once processed again, the imagery should create a clearer 3D model than what was produced in initial processing.

Figure 1: Pix4D processing point cloud and mesh.

Figure 2: Annotating a tight corner along the outside of a building

Figure 3: Annotated border (start) of object.
Figure 4: Zoomed in, correcting over annotated area over tire.

Figure 5: List of images available to conduct annotation

Figure 6: Angles of images in relation to object after initial processing
Figure 7: House with annotation

Figure 8: Tractor with annotation

Figure 9: "Guzzler" with annotation


Conclusion - There is a definite difference in the quality of the product. There are more areas that appear to be fuzzier than others without annotation. Below, (Figures 10 and 11) the difference can be seen. Figure 11 is much clearer than Figure 10 and has a much smoother boarder along the edges.

The same goes for the tractor animations, whereas the first video is without annotation and the second has annotation. The difference is very clear, in favor of the annotated imagery.

Had more pictures been trained, the expectation would be that the results would be even better. Though the process was tedious, the increased clarity in the product is worth the time. The annotating process was easy to do as well, and may be an ideal task for GIS interns.

Figure 10: House processed without annotation

Figure 11: House processed with annotation


Monday, April 10, 2017

Volumetrics

Introduction

In this week's lab the task was to learn about volumetrics and the different ways to create volumetric data from imagery. Volumetrics is a widely used application for using GIS systems. Companies, like sand mines use GIS companies to measure the volume of their product when in piles. This information is critical to their inventories and financial statements' validity.

In this lab we used volumetrics to estimate the volume of sand piles. Multiple methods were used to measure the volumes of three separate piles within Pix4D and ArcMAP. Imagery from the Litchfield Mine in Eau Claire, Wisconsin was once again processed in Pix4D software. Once done, volumetric measurements were taken from Pix4D and then ArcMAP functionality in various ways.  

Methods

- Pix4D - Pix4D's tool was the easiest to use. Once the imagery was processed, Pix4D has an easy and conspicous tool that creates new objects. the user simply makes a polygon shape around the area intended to be measured. The user is then able to press the compute button and Pix4D measures the volume.

  Pix4D then displays the volume on the left hand side of the screen (Figure 1). The user can measure and display multiple area volumes at once (Figure 2), which is very convenient. The sheer ease of the tool within Pix4D, combined with the known robust functionality of ESRI products like ArcMAP and ArcPRO add skepticism to the accuracy of the volumes measured in Pix4D.


Figure 1: Pix4D highlight of pile 2

Figure 2: All 3 piles in Pix4D with calculated volumes


- ArcMap - Multiple methods were used in ArcMAP. ArcMAP is a robust software sweet, that has increased functionality when compared to Pix4D. Within ArcMAP, there are many ways for users to derive volumetric data. Some tools that were used include raster clip, raster to TIN, add surface information, surface volume, and polygon volume.

  Once the imagery was processed in Pix4D and a geodatabase (Figure 3) was created, the imagery was brought into ArcMAP. Within ArcMAP, the various ArcMAP tools were then utilized. For this project, a digital surface model (DSM) and othomosaic were also created and imported via Pix4D. The DSM layer was especially important to the measurements. 


Figure 3: Geodatabase for volumetrics project

Figure 4: DSM layer properties of pile 1


Figure 5: DSM clip of pile 2


    - Raster Clip - A raster clip is a tool that allows the user to take a clip out of imagery (Figure 6), in this case, a DSM. Raster Clip was used to clip out a portion of the hillshade DSM in the processed Litchfield Mine imagery. Like Pix4D, the shape used to take the clip was a polygon. However in this case, the user doesn't want to simply go around the base of the area being measured, like in Pix4D. The user needs to include some area around base. This helps the imagery better process the starting elevation of the volume that's being measured, when measured. 


Figure 6: Raster clip around pile 1 in hillshade


    - Raster to TIN - A Triangulated Irregularity Network (TIN) is a digital data structure used in GIS to represent a surface. Raster to TIN allows a user to manipulate imagery to create TINs out of surface area. The result is a polygonal representation of surface area that looks like a playing surface or boarder in an old video game (Figures 7, 8, and 9). TINs make estimating volume easier for the software because it simplifies the surface.
Figure 7: TIN of pile 1

Figure 8: Close up of pile 3 TIN
Figure 9: All 3 TINs in hillshade


    - Add Surface Information, Surface Volume, and Polygon Volume - Within ArcMap is the ability to calculate this vital information. Adding surface information utilizes the area clipped but not included within the piles to get a good starting elevation. Once this critical starting point is established, measuring the surface volume (Figure 10) and polygon volume give the user the rest of the information needed to complete a volumetric analysis.


Figure 10: Adding surface volume information to pile 1


Maps - The Pile Surface map shows hillshade elevation as well as a portion of the raster clips at the base of the areas measured. These clips were taken from the DSM and then derived from the polygonal areas around the bases of the piles.

The TIN map show those same 3 piles taken from rasters and made into TINs. The TINs are what the volumetric data was taken from and this map highlights there own varying levels of elevation within the piles.  


Pix4D Volumes -
Figure 11: Pix4D pile volumes


ArcMAP Volumes -

Figure 12: ArcMAP pile volumes

Conclusion - Though the increased functionality that comes ArcMAP makes it perhaps the more accurate tool, Pix4D's method was much easier to use. Accuracy is key to volumetrics as it justifies the value of the data presented. Accurate volumes of inventories are critical to businesses and GIS users will undoubtedly choose the best tool available to them.

This was an informative lab, as it displayed a common and marketable application of UAS technology, in volumetrics. Knowing various ways to harvest volumetric data is valuable as well, in that the user can produce comparable data, validate data, and troubleshoot methods if needed.

Monday, April 3, 2017

Multi-Spectral UAS Imagery

Introduction

This week our task was to process multi-spectral UAS imagery. The imagery that was provided to us came from a RedEdge sensor. RedEdge allows users to capture imagery in multiple bands within the electromagnetic spectrum. The MicaSense RedEdge Sensor is what was introduced to us in this lab. This sensor captures the imagery in 5 bands; Blue, Green, Red, RedEdge, and Near-Infrared.

Users are able to create different combinations of the bands that represent different types of data that can't be seen by the naked eye. For example, a false color RedEdge combines the green, Near-Infrared, and RedEdge bands to create a Normalized Difference Vegetation Index (NDVI), which can be used to help determine the health of vegetation captured in the imagery.

By presenting the data in various band-combinations, users add value to what's being represented.

Methods

Dr. Hupy once again provided imagery for our lab. In this case, the subject of the imagery is a rural, residential lot, just north of Highway 12 and west of Fall Creek, WI.

What was new to me in this lab was the creation of a composite image. A composite image is an image that includes multiple bands within the electromagnetic spectrum. Once composited, a user can manipulate the combinations of the bands to change the colors and add value to the imagery. By doing so, the user represents value-added data in their presentation of the imagery, to an intentional end.


The imagery was processed in Pix4D and the composite image was made with ArcGIS Pro.

Another task in this lab was to recreate the lab that pertained to adding value by identifying pervious versus impervious area within the imagery.

Once the composite image was made, I experienced difficulty in following the task list within ArcGIS Pro, that was followed in the previous value-added lab. I transferred the imagery to ArcMap, where I was able to find and complete the tasks individually.


Maps

Once complete, I was able to generate 5 maps. RGB, False Color IR, Traditional Color IR, a Composite, and a pervious versus impervious (or permeable versus impermeable) surface map.


Conclusion

It's easy to see that processing imagery in multiple spectral bands allows for increased functionality, and thus, an increase in the potential of the value added to data.